计算物理第九次作业
5.13
Calculate the value of
by using numerical integration to estimate the area of a circle of unit radius. Observe how your estimate approaches the exact value (3.1415926…) as the grid size in the integration is reduced.
这里计算圆周率使用最简单的办法,即对一个半圆方程进行积分
使用数值计算的方法,把积分区间划为足够小的格子,然后累加即可,下面是课本上给出的最粗糙的数值积分方法
最后乘以2就得到了圆周率。下面画出误差随划分网格的个数的变化关系
from scipy.optimize import curve_fit
import numpy as np
import matplotlib.pyplot as pl

steps = np.arange(100000, 10000000, 100000)
ans = np.array([])
for i in steps:
    x = np.linspace(-1, 1, i)
    dx = 2 / i
    y = (1 - x * x) ** 0.5
    s = dx * np.sum(y) * 2
    ans = np.append(ans, (np.pi - s))

def func(x, a, b):
    return a * np.power(x, b)
popt, pcov = curve_fit(func, steps, ans)
fit = func(steps, popt[0],popt[1])

pl.figure(figsize = (10, 10), dpi = 80)
pl.plot(steps, ans, 'o', markersize = 3, label = 'Error')
pl.plot(steps, test, label = 'Fit')
pl.legend(loc = 'upper right')
pl.xlabel('Number of grids')
pl.ylabel('Error')
pl.title('The error versus number of grids')
pl.text(1e6, 1e-5, '$\Delta=%.2f N^{%.2f}$'% (popt[0], popt[1]), size = 20)
pl.xscale('log')
pl.yscale('log')
pl.show()
在双对数坐标下关系曲线为直线,说明误差与网格个数的关系是幂函数关系,拟合后发现是刚好成反比,实际应用上一般使用梯形近似或者辛普森近似等方法,会使精度在同等条件显著提高。
5.14
Write a program to calculate the magnetic field for your favorite current distribution. One possibility is a pair of loops of radius
, with one loop lying in the plane and the other in the plane. Another possibility is the solenoid considered in Figure 5.17. (自由发挥电流分布,形状越奇怪越好^_^)
利用毕奥-萨伐尔定律
首先将电流分布离散化,分别计算出
import matplotlib.pyplot as pl
import numpy as np
import mpl_toolkits.mplot3d.axes3d as ax3d

class magnetic:
    def __init__(self, current=1, discretization_length=0.01):
        self.current = current
        self.discretization_length = discretization_length

    def wire(self):
        radius = 1
        t = np.linspace(0, 2 * np.pi, 40)
        self.cir_1 = np.array([radius * np.sin(t) + 1, radius * np.cos(t), np.zeros(len(t))]).T
        self.cir_2 = np.array([np.zeros(len(t)), radius * np.sin(t), radius * np.cos(t) + 1]).T

        npts = len(self.cir_1)
        self.IdL = np.array([-self.cir_1[c+1]+self.cir_1[c] for c in range(npts-1)]) * self.current
        self.r1 = np.array([(self.cir_1[c+1]+self.cir_1[c])*0.5 for c in range(npts-1)])
        self.IdL = np.vstack((self.IdL, np.array([self.cir_2[c+1]-self.cir_2[c] for c in range(npts-1)]) * self.current))
        self.r1 = np.vstack((self.r1, np.array([(self.cir_2[c+1]+self.cir_2[c])*0.5 for c in range(npts-1)])))

    def calculate(self):
        B = []
        x = np.linspace(-2, 2, 10)
        y = np.linspace(-2, 2, 10)
        z = np.linspace(-2, 2, 10)
        grid = np.meshgrid(x, y, z)
        points = np.vstack(map(np.ravel, grid)).T
        for r in points:
            r2 = r - self.r1
            r25 = np.linalg.norm(r2, axis=1)**3
            r3 = r2 / r25[:, np.newaxis]
            cr = np.cross(self.IdL, r3)
            s = np.sum(cr, axis=0) * 1e-7
            B.append(s)
        self.B = np.array(B)

        fig = pl.figure(figsize = (10, 10), dpi = 80)
        ax = fig.gca(projection='3d')
        ax.quiver(points[:,0],points[:,1], points[:,2],self.B[:, 0],self.B[:, 1],self.B[:,2],color='b',length=0.3,normalize=True)
        ax.plot(self.cir_1[:, 0],self.cir_1[:, 1], self.cir_1[:, 2], 'r', linewidth = 2)
        ax.plot(self.cir_2[:, 0],self.cir_2[:, 1], self.cir_2[:, 2], 'r', linewidth = 2)
        ax.set_xlabel('x')
        ax.set_ylabel('y')
        ax.set_zlabel('z')
        pl.show()

if __name__ == '__main__':
    a = magnetic()
    a.wire()
    a.calculate()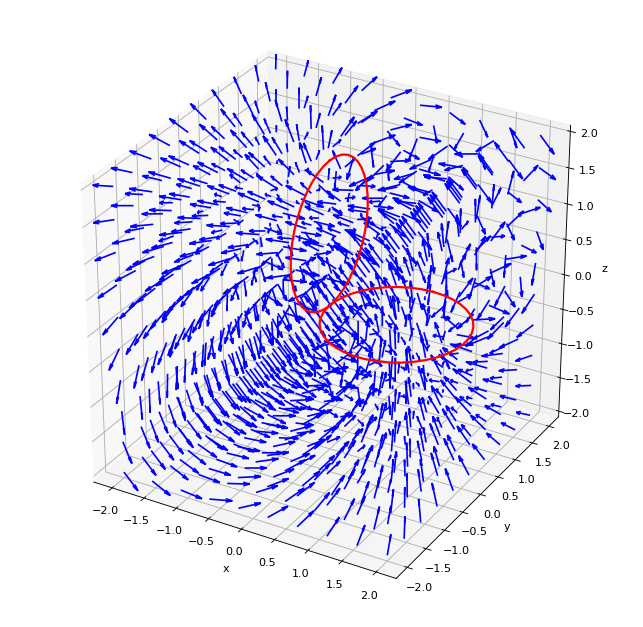
可以发现使用数值模拟可以很容易的计算出解析方法难以算出的磁场分布。下面使用常见的亥姆霍兹线圈进行模拟。
class magnetic2(magnetic):
    def wire(self):
        radius = 1.5
        t = np.linspace(0, 2 * np.pi, 40)
        self.cir_1 = np.array([radius * np.sin(t), radius * np.cos(t), np.zeros(len(t)) - 1]).T
        self.cir_2 = np.array([radius * np.sin(t), radius * np.cos(t), np.zeros(len(t)) + 1]).T

        npts = len(self.cir_1)
        self.IdL = np.array([-self.cir_1[c+1]+self.cir_1[c] for c in range(npts-1)]) * self.current
        self.r1 = np.array([(self.cir_1[c+1]+self.cir_1[c])*0.5 for c in range(npts-1)])
        self.IdL = np.vstack((self.IdL, np.array([-self.cir_2[c+1]+self.cir_2[c] for c in range(npts-1)]) * self.current))
        self.r1 = np.vstack((self.r1, np.array([(self.cir_2[c+1]+self.cir_2[c])*0.5 for c in range(npts-1)])))

if __name__ == '__main__':
    a = magnetic2()
    a.wire()
    a.calculate()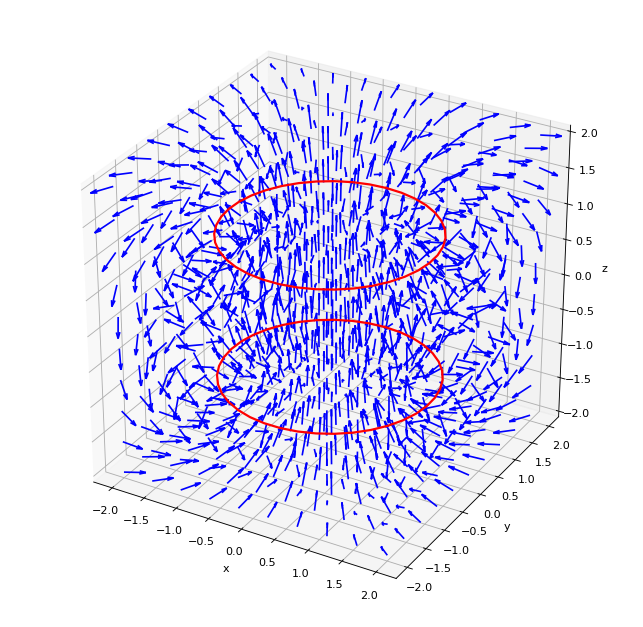
可以发现两个线圈之间确实是近似的匀强磁场,这和已知的理论相符。下面随便画一个电流分布
class magnetic3(magnetic):
    def wire(self):
        self.a = np.array([[0.5,0,0.5],[0.5,0,1],[1.5,0,1],[1.5,0,-0.5],[0.5,0,-0.5],[0.5,0,0.3],[-0.5,0,0.3],[-0.5,0,-0.5],[-1.5,0,-0.5],[-1.5,0,1],[-0.5,0,1],[-0.5,0,0.5],[0.5,0
        ,0.5]])

        npts = len(self.a)
        self.IdL = np.array([-self.a[c+1]+self.a[c] for c in range(npts-1)]) * self.current
        self.r1 = np.array([(self.a[c+1]+self.a[c])*0.5 for c in range(npts-1)])
    def calculate(self):
        B = []
        x = np.linspace(-2, 2, 10)
        y = np.linspace(-2, 2, 10)
        z = np.linspace(-2, 2, 10)
        grid = np.meshgrid(x, y, z)
        points = np.vstack(map(np.ravel, grid)).T
        for r in points:
            r2 = r - self.r1
            r25 = np.linalg.norm(r2, axis=1)**3
            r3 = r2 / r25[:, np.newaxis]
            cr = np.cross(self.IdL, r3)
            s = np.sum(cr, axis=0) * 1e-7
            B.append(s)
        self.B = np.array(B)

        fig = pl.figure(figsize = (10, 10), dpi = 80)
        ax = fig.gca(projection='3d')
        ax.quiver(points[:,0],points[:,1], points[:,2],self.B[:, 0],self.B[:, 1],self.B[:,2],color='r',length=0.3,normalize=True)
        ax.plot(self.a[:, 0],self.a[:, 1], self.a[:, 2], 'black', linewidth = 2)
        ax.set_xlabel('x')
        ax.set_ylabel('y')
        ax.set_zlabel('z')
        pl.show()

if __name__ == '__main__':
    a = magnetic3()
    a.wire()
    a.calculate()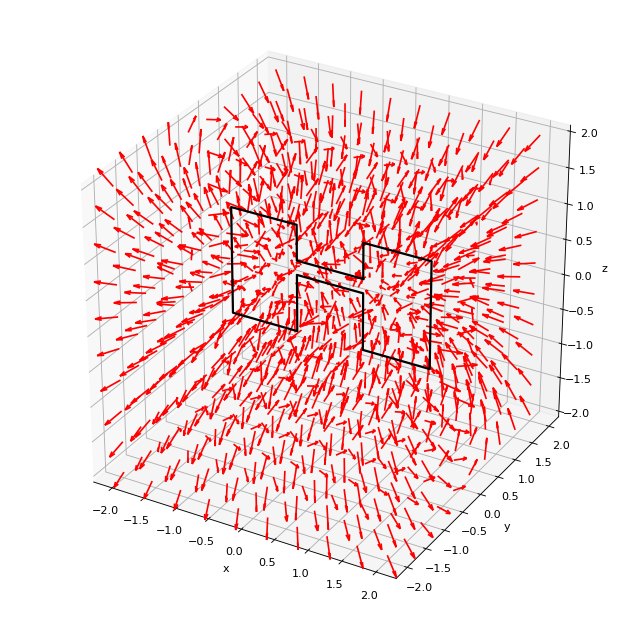
I’m angry!
致谢
十分感谢 这份教程,第二题思路和部分代码参考该教程,并进行了十分大的简化,原教程基本可以完美解决本问题。